
Salesforce administrators and developers need to do data loading. It is essential in data migration, bulk update and maintaining your Salesforce environment clean and up-to-date.
Although Smart Lookup Data Loader makes the data import process very easy, there are best practices that you can observe in order to make sure that you are using the tool to the full potential. Here, we are going to present some useful tricks on how to maximize the use of Smart Lookup Data Loader that includes field mapping, preparing data, and dealing with errors, etc.
1. Proper Data Preparation: The Key to Successful Imports
It is important to prepare data before even you start the process of importing data into Salesforce. Well-laid-out, clean data will be time-saving in the import process and its accuracy will be guaranteed.
Best Practices for Data Preparation:
- Eliminate Duplicates: The data you have should not have any duplicates. In case of need, determine and delete duplicates in Excel or other programs and then import.
- Check Data Consistency: Be sure that your data is consistent. As an example, you should have similar phone numbers, dates, and email addresses in all your CSV file. Irregular data types are subject to errors at the time of importing.
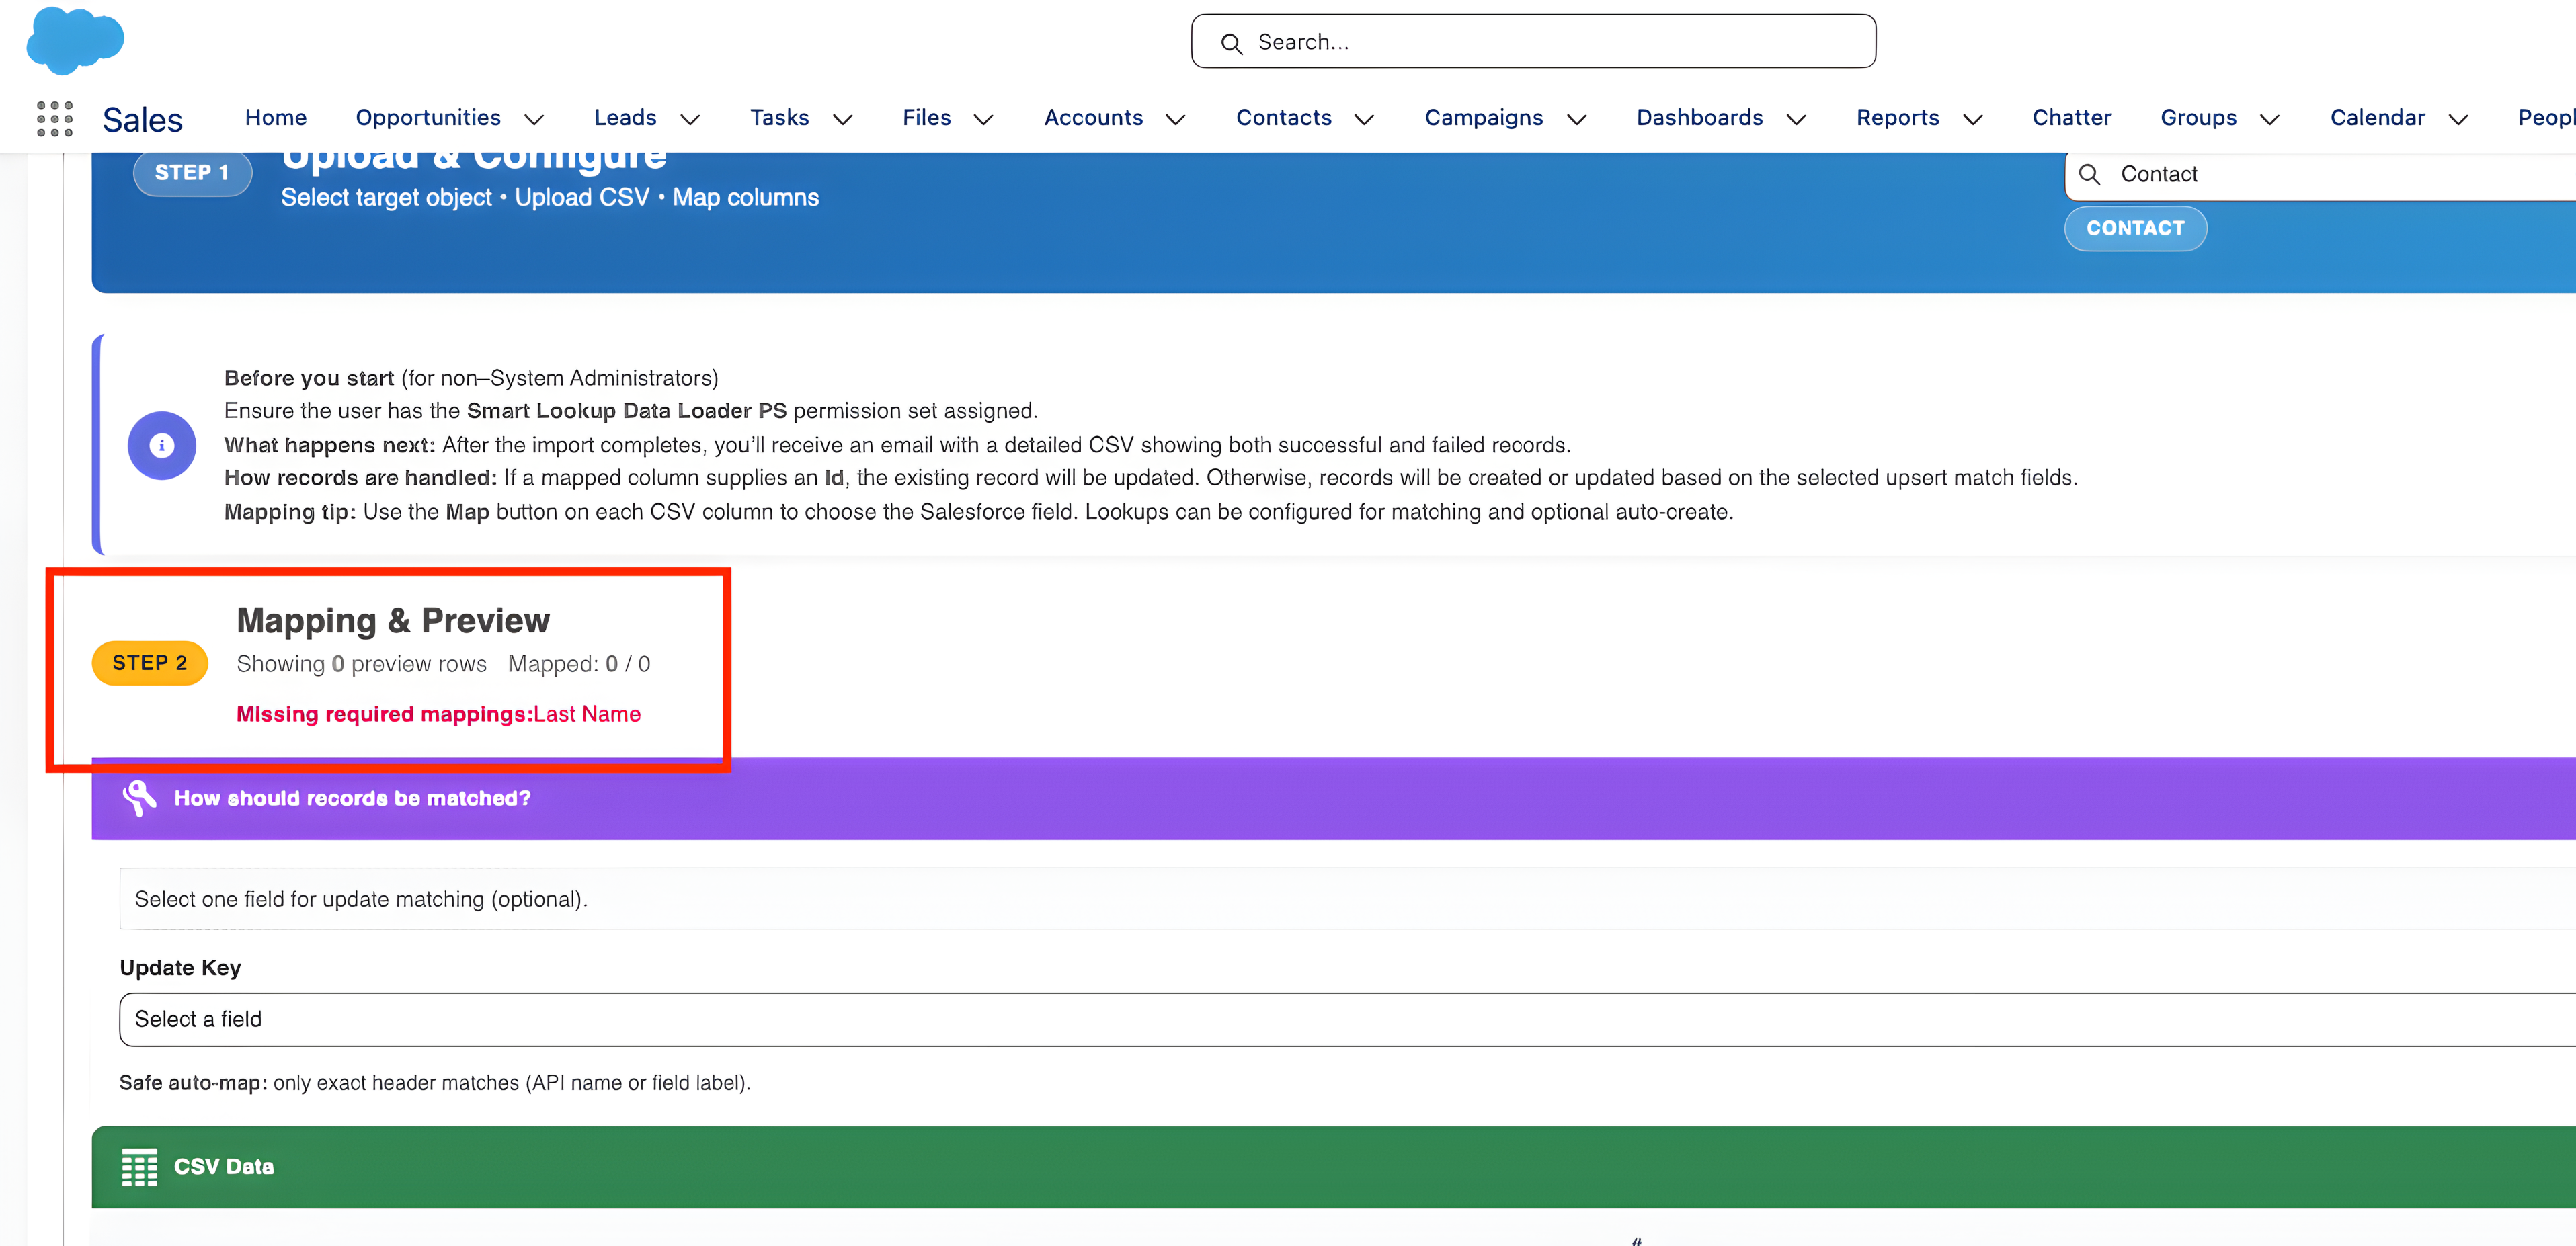
- Check Required Fields: Before proceeding with the import, be sure that all the necessary fields in Salesforce (such as Account Name, Contact Email, or Opportunity Stage) are included in the CSV file.
- Split Large Files into Smaller Pieces: In cases where the dataset size is huge, the idea of breaking the file into small pieces is a good option. It has the ability to accelerate the import and find it easier to troubleshoot in case there is some trouble.
2. Automate Field Mapping for Efficiency
Field mapping - connecting your CSV columns with Salesforce fields is one of the most tiresome aspects of data loading. To a large extent, this is automated by Smart Lookup Data Loader, still, it is important to be aware of the process to include the data appropriately.
Best Practices for Field Mapping:
- Review the Auto-Mapping: Most of the fields are automatically mapped by Smart Lookup Data Loader but before beginning the import, it is always best to review the field mappings. Make sure that all the columns are assigned to the right Salesforce ones (e.g., First Name into FirstName, Last Name into LastName).
- Manually Map Unmatched Fields: In case the tool fails to map a field automatically, then it is simple to map it manually by choosing the right Salesforce field in the dropdown menu. These fields should be checked, in particular with custom objects or with custom fields.
- Leverage Field Aliases: In case your CSV file has other terminologies than Salesforce (e.g., Phone Number in place of Phone), you can use the field alias option to align the terminologies and make the mapping process quicker.

3. Validate Your Data Before Importing
One of the most important stages in the importing process is data validation to make sure that the information on your CSV file is up to the required standards. Smart Lookup Data Loader provides internal validation tests to assist in making sure that your data is the right kind and it is importable.
Best Practices for Data Validation:
- Check Missing Necessary Fields: Make sure that all the necessary fields on Salesforce are included in the CSV file. The failure of the import may occur because of the missing information regarding such important fields as Account Name or Email.
- Use Data Types and Formats: Make sure that all the fields in your CSV file are the correct type of data in Salesforce. e.g. in your CSV, Date fields must be in Salesforce-compatible date format (MM/DD/YYYY).
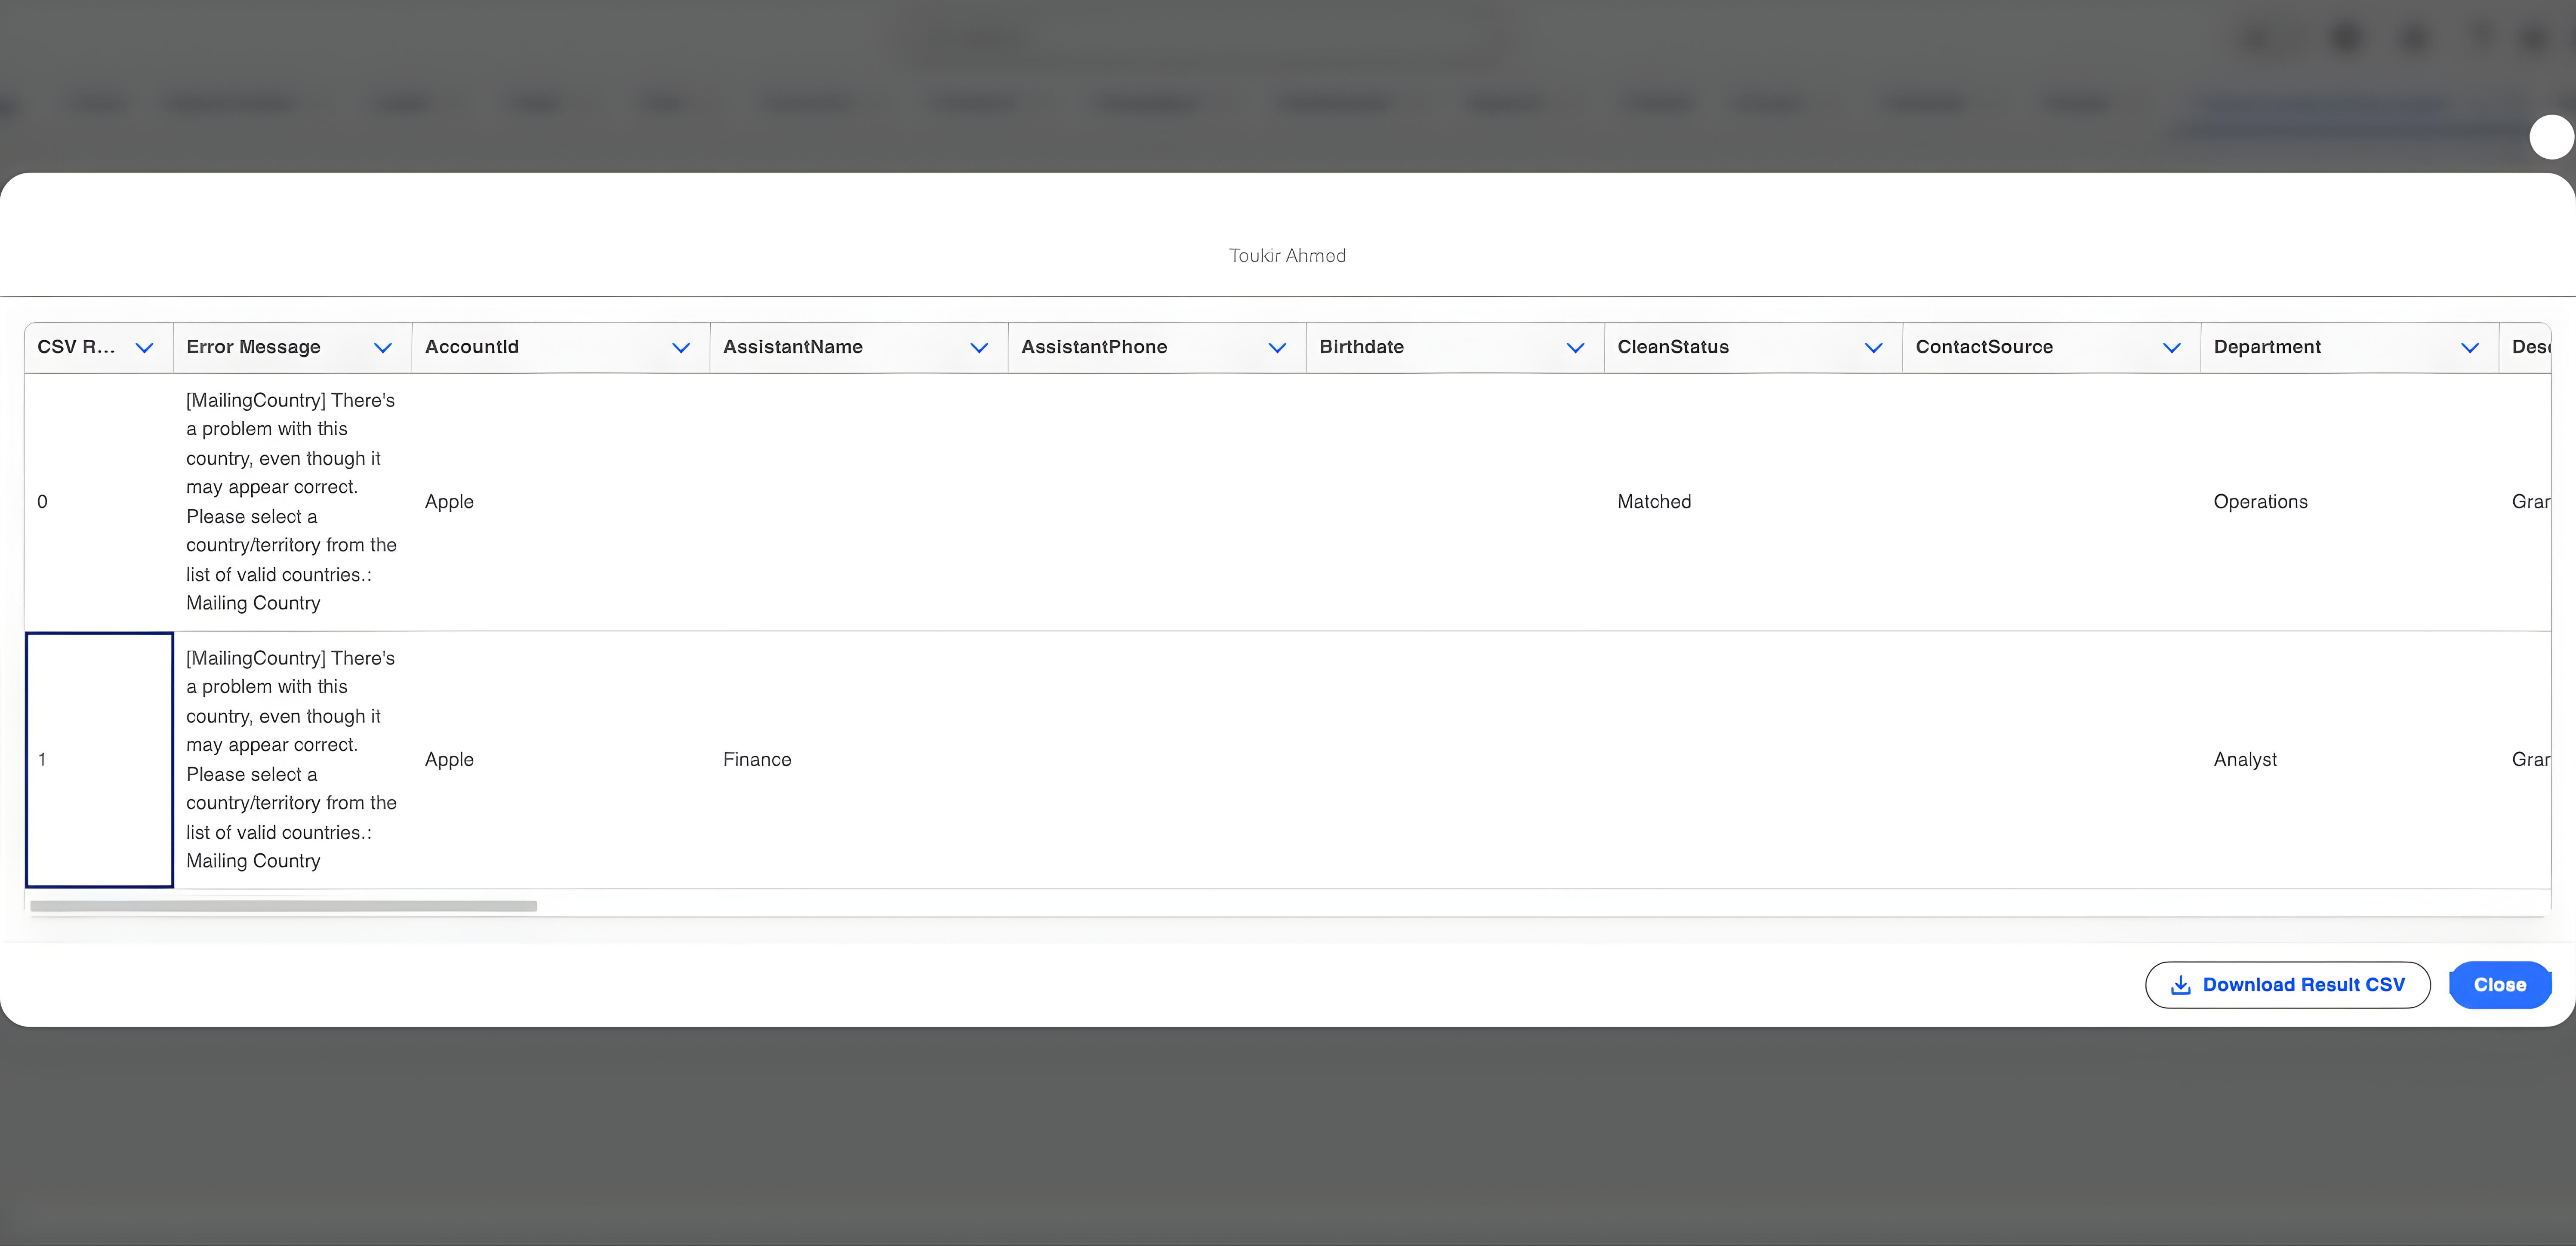
- Use the Validation Feature of Smart Lookup Data Loader: The product will automatically alert you of whatever is wrong with the data prior to the importation. Should data be missing, an invalid value, or there be an error in the formatting then the tool will point you to the problems and will not allow you to progress until you correct the problems.
4. Start with a Small Data Set for Testing
It is always good to start an import process with a small dataset before you run it on a full scale. It will enable you to identify any possible mistakes in time and optimize your import policy.
Best Practices for Testing:
- Test on a Small Sample: Start out with a small sample of your data (e.g. 5-10 records). This will aid in discovering any mapping errors or validation errors prior to a large scale import.
- Confirm Logic: When the small import is complete, inspect the logs and determine whether the data was imported properly. Ensure that all relationships (e.g. Contact to Account) were created appropriately.
- Select and Modify: According to the outcomes of the test, you are able to modify the mappings, format, and structure of the CSV file and then continue to make a larger import.
5. Monitor the Import Process and Handle Errors
Even given all the preparation and validation, errors may still arise at times of data imports. The best thing is that Smart Lookup Data Loader gives good feedback and error logs to assist you to monitor and troubleshoot the import process.
Best Practices for Monitoring and Troubleshooting:
- Track Progress: Smart Lookup Data Loader gives you a progress bar to be able to understand how far you have gone through the import process. In case the import is not taking the expected time, then you could check the progress and know whether there is a problem or not.
- Review Error Logs: In case of an error, the tool will create an error log with a lot of information of what records failed and the reason. Some of the common problems may consist of the mismatch of data type, the absence of needed fields, and the problem of lookups.
- Fix and Re-import: In case of any errors, correct the errors in the CSV file and re-import the corrected data. This is because the tool enables you to re-upload a corrected file without having to repeat the entire process.
6. Use the Import History for Ongoing Monitoring
After the import process has been done, you may view the past import logs using Import History tab. It will help you to trace your imports throughout the time, investigate their status, and find out whether there are some constant problems.
Best Practices for Import History:
- Check Import History: The Import History section enables you to look through all the past attempts of importing and the success/failure of the importing and the details of errors.
- Audit to Accuracy: Check that your data imports are correct using the history logs to verify that over time the imports are accurate.
- Export Logs to Documentation: You may export the logs so as to further document or analyze them. This particularly comes in handy when dealing with bigger projects or when dealing with more than one stakeholder.
Conclusion
These are the best practices that you can use to make sure that you are using Smart Lookup Data Loader to its maximum. The automated field mapping capabilities as well as the upsert feature of the tool, the automatic validation feature, and the error handling features all come together to ensure that your data imports are more efficient and more accurate than ever.
It can be the first information that you import or a continuous process of importing data, in any case, Smart Lookup Data Loader can save you time and minimize the number of errors and facilitate your Salesforce processes.
Are you willing to automate your data import?
Install Smart Lookup Data Loader now and make the first step towards the perfection of data loading in Salesforce.
Get it on AppExchange